Biscuit Stacking Machine Maintenance & Troubleshooting Guide
The Stacker as a Profit Center: A Strategic Guide to Maintenance, TCO, and OEE
Subtitle: The complete guide for owners, engineers, and operators to maximize the financial and operational performance of your biscuit stacking line.
I. The Strategic & Financial Impact of Stacker Maintenance
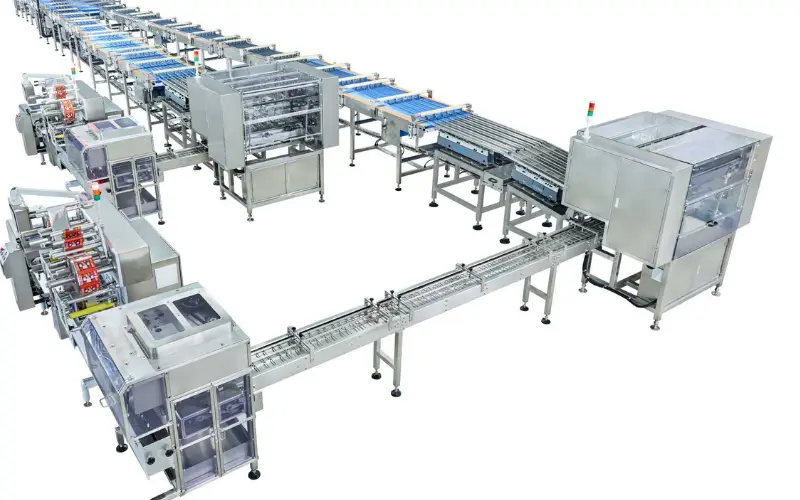
In the complex ecosystem of a modern biscuit factory, it's easy to focus on the high-profile assets: the massive tunnel oven, the high-speed flow wrappers, the complex dough mixers. The humble biscuit stacking machine—the critical link between baking and packaging—is often treated as a simple conveyor, a "good enough" piece of utility equipment.
This is a strategic and financial mistake.
A biscuit stacker is not a passive piece of metal; it is the active pacemaker for your entire line's profitability. It dictates the speed of your oven and the efficiency of your wrappers. When it runs smoothly, your line achieves its target OEE (Overall Equipment Effectiveness). When it stutters, the entire line chokes, and the financial impact cascades with horrifying speed.
For a complete overview of the technology and its core function, see our
A. Your Stacker is the "Pacemaker" of Your Line's Profitability
Think of your production line as a single, living organism. The oven is the lungs, the wrapper is the hands, and the biscuit stacker is the heart. If the heart stutters, the entire body fails.
Consider the cascading cost of a single 10-minute stoppage at the stacker caused by a jam:
Upstream Spoilage: The cooling conveyor, which is perfectly timed to deliver biscuits, continues to run. Biscuits pile up at the stacker infeed, causing breakage and creating 10 minutes' worth of product scrap.
Upstream Energy Waste: Your tunnel oven—a massive consumer of gas and electricity—doesn't stop. It continues to bake products that will now be scrap, wasting thousands in energy costs.
Downstream Idle Time: Your expensive, high-speed flow wrappers sit idle, their operators waiting. The wrapper's uptime, a key KPI, is now ruined by a machine that isn't its own.
Idle Labor Cost: Your line operators, from the oven to the case-packer, are paid to stand and wait.
That single 10-minute jam wasn't a 10-minute problem. It was a 10-minute line-wide shutdown that directly increased your Cost of Goods Sold (COGS) through wasted product, wasted energy, and wasted labor.
B. The TCO Fallacy: Why a "Cheaper" Machine Costs You More
Many purchasing decisions are driven by one number: the initial purchase price. This is the "TCO (Total Cost of Ownership) Fallacy." A machine's true cost is not what you pay for it; it's what you pay to run it over its 10-to-15-year lifespan.
Total Cost of Ownership = Initial Purchase Price + Operating Costs (Energy, Labor) + Maintenance Costs (Parts, Service) + Downtime Costs (Lost Production)
The "Downtime" variable is the killer. Let's compare two machines:
Machine A (The "Cheap" Stacker): $100,000 initial cost. It's a basic model with manual, tool-based changeovers (90 mins) and an average uptime of 95%.
Machine B (The "Smart" Stacker): $150,000 initial cost. It's a servo-driven machine with a recipe-based HMI, tool-less changeovers (15 mins), and 99.5% uptime.
The $50,000 savings on Machine A looks great to the procurement manager. But let's look at the financial reality for the plant manager.
That 4.5% difference in uptime (99.5% vs. 95%) on a line running 24/7 (8,760 hours/year) is 394 hours of lost production... every single year.
What is 394 hours of lost revenue worth to you? If your line produces 200 packs per minute at a profit of $0.10 per pack, that's $1,200 per hour in lost profit contribution.
394 hours of downtime x $1,200/hour = $472,800 in lost profit. In one year.
The $50,000 "savings" on the cheaper machine cost the company nearly half a million dollars in its first year of operation. This financial reality is why understanding the
C. [Unique Differentiator] The TCO & ROI Calculator
Don't just take our word for it. The numbers are unique to your factory, your labor costs, and your product value. We've built an interactive TCO & ROI Calculator to prove the point.
This tool allows you to enter your real-world data:
Your average hourly labor cost.
Your profit per pack.
Your packs per minute.
It will instantly calculate your "True Cost of Downtime Per Minute" and, most importantly, show you the annual dollar savings of switching from a 90-minute manual changeover to a 15-minute recipe-driven one. This is the number that transforms a maintenance discussion into a C-suite investment strategy.
II. 🚀 Key Takeaways
For the manager or owner, here are the most critical insights from this guide:
Maintenance is a Profit Driver, Not a Cost: Following this guide directly impacts OEE and profitability, extending asset lifespan and lowering TCO.
Safety First, Always: A correct LOTO (Lockout/Tagout) procedure is non-negotiable and the foundation of all maintenance tasks.
Look Upstream First: Most "stacker" problems (jams, miscounts) are symptoms of an upstream issue (e.g., inconsistent biscuit size, poor spacing).
Changeover Speed = Profit: The single biggest lever for boosting line capacity is minimizing changeover time via recipe-driven, tool-less adjustments.
A Stacker is a "Smart" Device: Use the data (HMI, sensors, CMMS integration) to move from reactive fixes to predictive maintenance.
III. The Proactive Maintenance Program (PMP)
A world-class maintenance program is not "fixing things when they break." It is a disciplined, proactive schedule of tasks designed to ensure they never break in the first place. This is the difference between a reactive, chaotic plant floor and a predictable, profitable one.
A. CRITICAL: The LOTO (Lockout/Tagout) Procedure
Before a single tool is touched or a single guard is opened, all personnel must follow the LOTO procedure. This is the most important section of this entire guide. It is a non-negotiable safety and
Hitting an E-stop button is NOT LOTO. An E-stop only stops the control circuit; it does not remove power. A LOTO procedure ensures a zero-energy state.
Notify: Inform all affected operators and managers that the biscuit stacker is being shut down for maintenance.
Isolate (Electrical): Go to the main electrical disconnect for the machine. Turn it to the "OFF" position. Apply your personal lock and tag.
Isolate (Pneumatic): Go to the main compressed air shutoff valve for the machine. Close the valve. Apply your personal lock and tag.
Vent (Pneumatic): The machine's pneumatic system still holds trapped air. Find the main air dump or vent valve and open it. You should hear a "pssssh" sound as the residual air pressure is released. All cylinders should now be in a safe, de-energized state.
Verify (Test): Go to the machine's HMI or start button and attempt to turn it on. It should not respond. This is your "zero-energy state" verification.

B. The Operator's 5-Minute Daily Check (Pre-Startup)
This check is performed by the machine operator at the start of their shift. It catches 80% of common problems.
Safety: Visually confirm all guards are in place and locked. Press and reset each E-stop button to ensure it's mechanically functional.
Sensors: Wipe the lenses of all photoelectric sensors (photo-eyes) with a soft, dry cloth. A fingerprint or a dusting of flour can cause miscounts.
Air Pressure: Check the main air pressure gauge (FRL - Filter, Regulator, Lubricator). It should be at the specified pressure (e.g., 90 psi / 6 bar).
Debris: Visually inspect the machine for any loose crumbs, broken biscuits, or film from the previous run.
Belts: Confirm belts are tracking in the center of their rollers.
C. The Maintenance Crew's Weekly PM Checklist
This is a more in-depth check, performed by a qualified maintenance technician.
Belt Tension & Tracking: Check the tension on all conveyor belts. A good rule of thumb is the "1% rule": the belt should deflect about 1% of its span with light-to-medium hand pressure. Adjust tracking rollers if the belt is favoring one side.
Wear Parts: Visually inspect high-contact wear parts. For a
star wheel stacker, a deep-dive on maintenance can prevent chipping the pockets. For a "penny stacker," check the pusher paddles; for fragile or coated products, thegentle handling of a penny stacker requires unique inspection.Fasteners: On high-vibration areas (like servo motor mounts or pusher assemblies), spot-check that all bolts and fasteners are tight.
Pneumatics: With the machine running, listen for the "hissing" sound of a compressed air leak. A small, 1/16" leak can cost over $500 per year in wasted electricity.
D. The Engineer's Monthly Deep Dive
This is the full preventative maintenance (PM) service. This monthly PM schedule is scalable and applies to all models, from a
Lubrication: Following the machine's lubrication chart, apply the correct H1 food-grade lubricant to all specified bearings, grease points, and chains. (More on this in Section VI-C).
Cabinet Filters: Power down the machine (full LOTO). Open the main electrical control cabinet. Remove, clean, or replace the cabinet's air intake filters. A clogged filter is the #1 cause of overheating, which leads to a $5,000 servo drive failure.
Spare Parts Audit: Check your on-site spare parts cabinet against the "Critical Spares List" (Section VII-A). Order any parts that were used during the month.
Chain Tension: If your machine uses roller chains, check them for proper tension (sag) and lubrication.
IV. The "Food Safety" Cleaning & Sanitation SOP
For a food plant, a "visibly clean" machine is not clean enough. A biscuit stacker has dozens of food-contact surfaces. Improper cleaning can lead to bacterial growth (like Salmonella or Listeria) or, more commonly, allergen cross-contamination.
A. Beyond "Visibly Clean": Preventing Allergen Cross-Contamination
Running a "peanut-free" biscuit on a line that just ran a "peanut butter sandwich" biscuit is a high-risk activity. Your cleaning Standard Operating Procedure (SOP) is your only defense against a product recall that could cost millions and destroy consumer trust. A "visibly clean" surface can still hold microscopic protein residues (the allergen). Your cleaning process must be validated to remove these residues.
B. The 4-Step Industrial Cleaning Process (Audit-Ready)
Follow this four-step "wet clean" process, which is the gold standard for HACCP, GFSI, and
Step 1: LOTO & Dry Clean:
Perform a full LOTO procedure.
Remove all gross debris—broken biscuits, clumps of filling, etc. Use dedicated, color-coded scrapers and brushes.
Never use high-pressure air or water for this step, as it aerosolizes bacteria and allergens, spreading them across your plant.
Step 2: Clean (The Chemical Step):
Apply a food-grade alkaline cleaner (or chlorinated alkaline foam).
Why alkaline? Biscuit soils are fats, oils, and proteins. An alkaline detergent (high pH) attacks these organic soils through a process called saponification, turning the fat into a water-soluble soap.
An acid cleaner (low pH) is for mineral scale (like water spots) and will not effectively remove biscuit soils.
Allow the foam or detergent to sit for its required "contact time" (e.g., 5-10 minutes) to break down the soils.
Step 3: Rinse:
Using potable, low-pressure water, rinse the machine from the top down.
Ensure all detergent residue is removed. A detergent is a soil, and sanitizer (Step 4) cannot work on a soiled surface.
Step 4: Sanitize:
Apply a food-safe, no-rinse sanitizer (such as a Quaternary Ammonium or PAA-based solution).
This is the "kill step." It must be applied to a surface that is already clean.
Pay critical attention to the sanitizer's required contact time (e.g., 60 seconds). The surface must remain visibly wet for this duration to be effective.
Let the surface air dry. Do not wipe it with a towel, which can reintroduce contamination.

C. Cleaning "Hot Spots" & Material Science
Hot Spots: Pay special attention to hard-to-clean areas:
Underneath conveyor belts and around return rollers.
Inside the pockets of star wheels.
Around sensor brackets and mounting hardware.
Any non-sanitary designs like hollow-frame tubing or exposed threads.
Material Science (H1 Lubricants): Any lubricant used on a biscuit stacking machine must be rated NSF H1 Food-Grade.
H1 = Certified for "incidental food contact." This is the only acceptable standard for a food-handling machine.
H2 = Certified for non-food-contact surfaces. Not acceptable for a stacker.
Using the wrong grease is a critical failure during a food safety audit.
Note: For lines running multiple products, allergen control is paramount. Use dedicated, color-coded brushes and tools for allergen-specific areas (e.g., "Red for Peanut"). Your sanitation SOP should be validated with ATP or protein swabs to prove all allergen residues are gone.
V. Mastering the Quick Changeover Procedure (QCP)
In a modern, high-mix bakery, the single biggest source of lost capacity is not machine speed—it's changeover time. The ability to switch from Product A to Product B is a direct lever on your profitability. This is where the design of your biscuit stacker becomes a strategic weapon... or a boat anchor.

A. "Good" Changeover (The 15-Minute Profit-Maker)
This is what a modern, optimized changeover looks like on a servo-driven biscuit stacker:
Preparation: The operator stages the (few) required change parts, which are lightweight and designed to be swapped by hand.
HMI Selection (The "Recipe"): The operator selects "Round Cookie - 10 Stack" from the HMI.
Automatic Adjustments: The machine's servo motors automatically adjust stack count, pusher speed, and transfer timing.
Guided Manual Adjustments: The HMI screen now displays a simple diagram:
Adjust Guide Rail 1 to Position 5.2Adjust Star Wheel 2 to Position C-4Tool-Less Action: The operator walks to Guide Rail 1, pulls a quick-release handle (no tools), slides the guide until a digital position indicator reads "5.2," and locks the handle. They do the same for the star wheel.
Verification: The operator runs a test batch. It's perfect on the first try.
Total Time: 15 minutes.
B. "Bad" Changeover (The 90-Minute Profit-Killer)
This is the grim reality for plants using older or cheaper equipment:
Preparation: The operator must find a mechanic.
Research: The mechanic and operator hunt for the "Setup Sheet" for "Round Cookie - 10 Stack" in a greasy binder.
Tools: The mechanic gets a large tool cart.
Manual Adjustments: The mechanic uses an Allen key and a wrench to loosen 8 bolts on Guide Rail 1.
Guesswork: The operator holds a tape measure while the mechanic taps the rail with a rubber mallet to get it to "105mm." They tighten the 8 bolts.
Repeat: They repeat this tedious, two-person process for three other guide rails and the star wheel assembly.
Verification: They run a test batch. The stacks are crooked.
Rework: They re-loosen, "tap" it a bit more, and re-tighten. They run another test batch. It's "good enough."
Total Time: 90 minutes.
C. The Financial Impact
That 75-minute difference (90 min vs 15 min) is 75 minutes of lost production capacity. If you run two changeovers per day over a 250-day production year, that is 312.5 hours of lost time.
As we saw in Section I, that lost time is worth hundreds of thousands of dollars. The "Good" changeover system isn't a "nice to have" feature; it is a core component of your line's profitability.
VI. The Complete Troubleshooting Guide (For All Personnel)
When a biscuit stacker stops, the entire line stops. The pressure to "just get it running" is immense. This leads to "Band-Aid" fixes that don't solve the underlying problem. This guide provides a methodical framework for finding the root cause and fixing it permanently.
A. [Unique Differentiator] The Golden Rule: The Upstream/Downstream Audit
STOP! Before you touch the biscuit stacker, look around. The stacker is often just the symptom of a problem, not the source. A stacker is a precision machine, and it can only handle what it is given.
Note: 90% of stacker faults are symptoms. An operator who "fixes" a jam without checking the upstream biscuit quality is only fixing the problem for the next 30 seconds. Always diagnose upstream first.
The Upstream Audit (Check this first):
Biscuit Quality: Are the biscuits warped or bowed? (A common result of uneven cooling). A warped biscuit will not sit in a star wheel pocket correctly.
Biscuit Dimensions: Get your calipers. Is the biscuit in spec? If the recipe calls for a 5.0mm thick biscuit and the oven is producing 5.3mm biscuits, your 10-biscuit stack is now 3mm too tall and will jam at the transfer.
Biscuit Spacing: Look at the infeed from the cooling conveyor. Are the biscuits evenly spaced? Or are they "shingled" (overlapping) or arriving in clumps? The stacker's sensors expect a single biscuit at a time.
The Downstream Audit (Check this second):
Wrapper Status: Is the downstream flow wrapper in a "Fault" or "E-Stop" state?
Wrapper "Call" Signal: Modern lines use a "call" signal. The wrapper has a sensor that says "I am ready for a stack." If the wrapper is not ready (e.g., changing film), it will not send the "call" signal. Your biscuit stacker is working perfectly—it's simply, and correctly, waiting for the "go" signal. This "handshake" is the core of
integrating a biscuit stacker with a packaging line .
B. Common Operator-Level Fixes (Top 5 Problems)
If you've cleared the Upstream/Downstream audits, here are the most common machine-level faults.
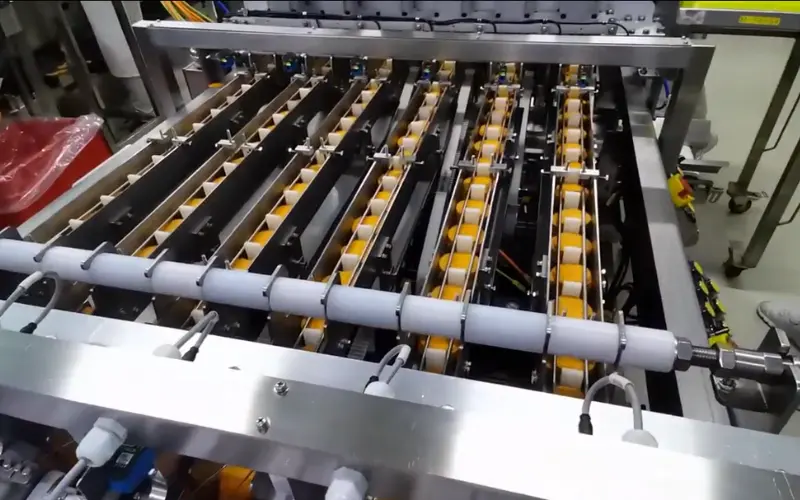
[Image 4: A visual troubleshooting guide. A photo of a common jam point (e.g., star wheel infeed) with callout boxes pointing to "1. Check Upstream Biscuit Spec," "2. Check Sensor Eye," and "3. Check Star Wheel Pocket for Wear."]
| Problem | Cause | Operator Fix (After LOTO) |
| 1. Jams at Infeed | Dirty Sensor: A speck of flour or a fingerprint on the infeed photo-eye is preventing it from "seeing" the biscuit. | LOTO. Wipe the sensor lens with a soft, dry cloth. |
| 2. Miscounts / Empty Stacks | Misaligned Sensor: The sensor was bumped or misaligned during the last changeover. | LOTO. Check the sensor's mounting bracket. See if it's triggering (usually a red/green light) as a biscuit passes. If not, notify maintenance to realign. |
| 3. Dropping Biscuits (Vacuum Stackers) | Clogged Vacuum Filter: The #1 cause of weak suction. The machine can't "hold on" to the product. | LOTO. Locate the main vacuum pump. Open the filter housing, remove the filter element, and clean it with compressed air (or replace it if needed). |
| 4. Belt Slipping (Squealing sound) | Contamination or Tension: The drive roller or belt is greasy/wet, or the belt tension is too loose. | LOTO. Clean the belt and rollers per the Sanitation SOP (Section IV). If it persists, notify maintenance to check belt tension. |
| 5. HMI Fault Screen | E-Stop Active: The most common "fault" is simply an E-Stop button (often on the far side of the machine) that was pressed and not reset. | Check the HMI screen (it will say "E-STOP ACTIVE"). Visually inspect and reset all E-stop buttons on the line. |
C. Advanced Mechanical Diagnostics (For the Mechanical Engineer)
For deeper, recurring issues, an engineer must go beyond the operator's fix.
Root Cause Analysis (RCA) Framework: Use the "5 Whys" method.
Symptom: The stacker jams every 20 minutes.
Why 1? The pusher arm is crushing the last biscuit in the stack.
Why 2? The pusher's timing is slightly off.
Why 3? The servo motor that drives the pusher is hesitating.
Why 4? The servo drive is logging an "intermittent encoder" fault.
Why 5? The encoder cable is loose at the motor connection due to vibration.
Root Cause: Vibration.
Permanent Fix: Tighten the encoder cable and install a proper strain-relief bracket to isolate it from vibration.
Diagnostics by Sound: A trained ear is a powerful tool.
High-Pitched Whine: A bearing is dry or failing. Use a thermal gun to find the hot bearing and schedule it for replacement.
Rhythmic "Slap" or "Click": A damaged conveyor belt (a bad splice) or a seized link in a roller chain.
Loud "Thud" / "Bang": A pneumatic cylinder is bottoming out (its internal cushion is blown) or a servo profile is too aggressive and needs to be "ramped down."
Lubrication Deep Dive: As mentioned, all lubricants must be H1 food-grade. But it's more complex than that.
Viscosity: Use the viscosity (e.g., ISO VG 220) specified by the manufacturer.
Temperature: A bearing near the oven needs a grease with a high drop point (won't liquefy). A bearing in a cold room needs a low-temperature grease (won't stiffen).
Frequency: Over-greasing is as bad as under-greasing. Excess grease attracts dust and crumbs, creating an abrasive paste that accelerates wear. Follow the monthly PM schedule.
D. Electrical & Controls Troubleshooting (For the Electrical Engineer)
When the HMI shows a fault, it's the control engineer's time to shine.
Top HMI Error Code Table: This is a sample of a modern HMI's diagnostic-first design.
| Code | Meaning | What to Do |
| E-101: SENSOR [IN_1.1] BLOCKED | Infeed photo-eye 1.1 has been blocked for longer than the set timeout. | 99% Fix: A biscuit is jammed or the sensor is dirty. 1% Fix: The sensor has failed or its cable is cut. |
| E-205: SERVO [X_AXIS] FAULT | The main pusher servo drive (X-Axis) is reporting an internal fault. | This is a hard fault. LOTO the machine. Open the main cabinet. Look at the digital display on the servo drive itself. It will show a more specific code (e.g., "AL.24 - Encoder Comms Error"). This code is what you tell tech support. |
| E-300: E-STOP ACTIVE | An Emergency Stop button is pressed. | Visually find and reset the E-stop. The HMI should indicate which E-stop (e.g., "E-Stop - Operator Side"). |
| E-401: DOWNSTREAM NOT READY | The biscuit stacker is healthy, but the flow wrapper is not sending the "Ready to Receive" signal. | This is not a stacker fault. Walk to the flow wrapper and check its status. It's likely in E-stop, fault, or film-change mode. |
Sensor Calibration: "Miscounts" are often a calibration issue. A modern photoelectric sensor has a "Teach" button.
Place a biscuit in front of the sensor.
Press and hold the "Teach" button to set the "product present" (light) state.
Remove the biscuit.
Press the "Teach" button again to set the "no product" (dark) state.
This 30-second procedure teaches the sensor the precise difference between your biscuit and the conveyor belt, eliminating false triggers from crumbs.
Cabinet PM: The #1 killer of all industrial electronics is heat. The #1 cause of heat is dust. Once a month, LOTO the machine and open the main control cabinet. Clean or replace the air intake filters. This 3-minute, $10 fix prevents a $5,000 servo drive failure.
VII. Strategic Sourcing & Inventory (For the Procurement Manager)
A biscuit stacker is down. The line is stopped. The maintenance tech has diagnosed the problem: a failed sensor. Now, the entire factory's OEE rests on one question for the Procurement Manager: "Do we have one?"
A. The "Line-Down" Critical Spares List
A smart inventory is not a "full" inventory. It's a tiered, strategic list.
Tier 1 (Keep On-Site - Your "Line-Down Kit"): These are relatively low-cost, high-wear, or high-risk parts that can be changed in under 30 minutes.
1x of each Photoelectric Sensor
1x of each Proximity Switch
1 set of replacement Belts
1 set of Vacuum Filters
1 tube of H1 Food-Grade Grease
Tier 2 (Vendor-Stocked - 24-Hour Shipping): These are expensive, reliable, mission-critical components. You don't need to own them, but your vendor must guarantee 24-hour shipping.
1x Servo Drive (pre-programmed with your machine's parameters)
1x HMI (Human-Machine Interface)
Tier 3 (Long-Lead-Time / Fabricated): These are custom-machined parts.
Star wheels, custom guide rails, main shafts. These have a 6-12 week lead time. You should audit them annually and plan for their replacement.
B. The OEM vs. 3rd-Party Parts Analysis
We believe in transparency.
When to use 3rd-Party: For a standard sensor (e.g., a Banner or Keyence photo-eye) or a standard bearing, a 3rd-party part is often fine.
When to demand OEM: For custom-molded star wheel pockets, servo motors, or a pre-programmed servo drive. A 3rd-party "equivalent" servo drive doesn't have your machine's unique motion profiles, and a "close enough" star wheel pocket will chip your biscuits, destroying your quality.
C. Beyond the Part: The Service Level Agreement (SLA)
A good vendor doesn't just sell you a machine; they sell you uptime. Your SLA is your uptime guarantee. It should include:
24/7 technical phone support.
Guaranteed 24-hour shipping of all Tier 2 critical parts.
A commitment to having a service technician on-site within 48 hours.
VIII. Implementation & Future-Proofing Your Line
This guide is only a document. To create value, it must be integrated into your factory's daily operations and future-proofed with technology.
A. Implementing Your Maintenance Program (For the Maint. Manager)
[Unique Differentiator] CMMS Integration Pack:
Stop typing. To make this easy, we provide a pre-formatted .csv file with this entire PM schedule (Daily, Weekly, Monthly tasks) and our full Critical Spares List with our part numbers. You can import this directly into your CMMS (Computerized Maintenance Management System) like Fiix, UpKeep, or eMaint in 60 seconds.
[Unique Differentiator] The Operator Training Checklist:
We provide a downloadable, one-page PDF of the Daily Checks (Section III-B) and Operator-Level Fixes (Section VI-B). Laminate it and keep it at the machine. Use it to certify your operators. An empowered operator is your best defense against downtime.
Tip: Your CMMS is a data goldmine. Use it to track which parts are failing most often. This data is key to spotting long-term trends and justifying an upgrade (e.g., "Sensor 4 on line 2 has failed 6 times; we need a more robust model"). It helps you move from preventative to predictive maintenance.
B. [Unique Differentiator] Your Industry 4.0 Upgrade Path (For the Owner)
A modern biscuit stacking machine is not a "dumb" piece of iron. It's a smart, data-generating hub. Your next machine must be Industry 4.0-ready.

Data Logging (OEE): Our HMI doesn't just show faults; it logs them. It outputs critical OEE data (runtime, fault time, biscuit count, average speed) via EtherNet/IP or OPC-UA directly to your factory's MES or SCADA system. You can't improve what you don't measure.
PackML Ready: We build on the
PackML (ISA-TR88) standard . This isn't a proprietary, locked-down system. It means our biscuit stacker "speaks the same language" as your oven and wrapper, allowing for faster, cheaper, "plug-and-play" integration.Remote Diagnostics: With your permission, our secure remote-access module allows our technicians to log in, see your HMI, and diagnose 90% of software or parameter faults in minutes, not days. This saves you an expensive service call and turns hours of downtime into minutes.
IX. Conclusion: A Partnership in Predictable Performance
A biscuit stacker is not a commodity. It is not the end of one process, but the critical, high-speed beginning of your cash-generating packaging line.
When treated as a simple utility, it becomes a bottleneck, a source of chaos, and a drain on profitability.
But when treated as the strategic asset it is—when it is maintained proactively, cleaned correctly, and understood by a trained team—it becomes the pacemaker of a stable, predictable, and highly profitable line. This guide has provided the tools to manage it. Now, let's build a predictable line, together.
X. Frequently Asked Questions (FAQs)
Q1: What is the single most common cause of biscuit jams in a stacker?
A: Upstream issues. 90% of the time, the stacker is jamming because the product it's being fed is out of spec. Before you blame the stacker, get your calipers and check the biscuit dimensions (thickness, diameter, warping) against the recipe's specifications. Also, check the infeed spacing from the cooling conveyor.
Q2: What is the best cleaning chemical for a biscuit line?
A: An alkaline or chlorinated alkaline cleaner. The primary soils on a biscuit line are fats, oils, and proteins from the dough and any fillings. An alkaline (high pH) cleaner is designed to saponify (break down) these organic soils, making them water-soluble. An acid cleaner is for mineral scale and will not be effective.
Q3: My stacker is miscounting or sending empty slugs to the wrapper. What's the fix?
A: The most likely cause (99% of the time) is a dirty sensor. The photoelectric "eye" that counts the biscuits is likely obscured by a dusting of flour, sugar, or a fingerprint. Perform a LOTO, then wipe the sensor lens with a soft, clean, dry cloth. If this persists, the sensor may be misaligned or need to be "re-taught" (see Section VI-D).
Q4: How long should a biscuit stacker changeover take?
A: This is the key difference between an older machine and a modern one. A "bad" changeover, requiring tools, tape measures, and "trial-and-error," can take 60-90 minutes. A "good," optimized changeover on a modern machine with a recipe-based HMI and tool-less adjustments should take 15 minutes or less.
Q5: Is it worth retrofitting my old stacker, or should I just buy a new one?
A: This is the "retrofit trap." You can spend thousands adding a new sensor or guide rail to a 20-year-old machine, but you cannot fix its core problem. If the machine is not built on a servo-driven platform and does not have a recipe-based HMI, you are patching a sinking ship. Our guide to biscuit stacker price and ROI breaks down this financial calculation in detail. The annual cost of its long changeovers and high downtime (as shown in our TCO analysis) will almost certainly be higher than the financing payment on a new, highly efficient machine.
XI. Your Line is Calling. We're Ready to Answer.
Your line's OEE is too important for guesswork. A jam is not just a jam; it's a data point. A slow changeover is not an inconvenience; it's a measurable drain on your profitability.
Our engineers are not just machine builders; they are line-wide efficiency experts. We specialize in diagnosing and eliminating the bottlenecks that hold your production hostage, from the oven to the case-packer.
Contact us today for a free, no-obligation Line Efficiency Audit.
We will analyze your current changeover and maintenance procedures and provide a concrete report on how you can unlock hidden capacity and turn your biscuit stacker into the true profit center it was meant to be.

Ready to start your journey toward a customized solution? Contact me directly on WhatsApp to begin the conversation.